Wire Tutorial - Creating a SubPatch
|
The Wire software and documentation is Copyright 2000-2008 by SoftSynth.com,
All Rights Reserved
The collection of modules that you created in the previous tutorial
pages is called a patch. A patch can contain other patches, which
allows you to build a complex hierarchy of patches. Let's add a simple
patch to our existing patch. We will create a very simple patch that just
contains one oscillator. This oscillator can be controlled by an external
frequency port, and its output will be sent to an external output port.
-
Select the oscillator in our top patch by clicking on the top of the sawOscBL
module. It should highlight when selected.
-
Delete the selected oscillator by hitting the Delete key or the Backspace
key. You can also select Delete from the Edit menu.
-
Select "Empty Patch" from the "Add" menu. You should see a box labelled
"patch" appear.
-
Double click on the "patch" box. A window will open so that you can edit
that patch.
-
Select "InputPort" from the "Add, ExternalPorts" menu.
-
Change the name to "frequency". It must be spelled exactly correct because
"frequency" has a special meaning to Wire.
-
Set the Value to 400.0 and the Maximum to 3000.0. Click OK.
-
Click in the TopPatch window. If you cannot find the Top Patch window,
you can select "Parent" from the new patch's View menu.
-
Notice that the frequency port has appeared as a port on the patch in this
higher level window.
-
Double click on the "patch" box again.
-
Select "SquareOscillatorBL" from the "Add, Oscillators" menu.
-
Move the modules apart.
-
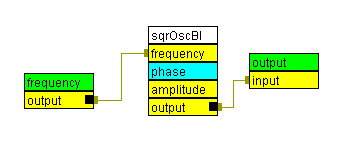
Connect the output jack of the "frequency" port to the frequency jack of
the oscillator.
-
Select "OutputPort" from the "Add, ExternalPorts" menu and click OK.
-
Connect the output of the oscillator to the input of the new output module.
You should see this:

-
Select "Save As..." from the "File" menu.
-
Save this patch in the file "MyPatch.xml".
Previous | Top |
Next

